
Last time I mentioned that units are cheap to build. They’re also fast to build once you get a few buildings up. Units are disposable things that come and go, so the game usually comes down to aggressively attacking buildings rather than whose army is left standing after a series of skirmishes. So how does squad vs. building combat work out?
By needing to be very aggressive. Despite the interesting things Perimeter does with its buildings, it is not a game where you can put up some fortifications, relax and build things to your heart’s content.
This mostly comes down to needing flat ground to build on. At the beginning of a game, you’ll have a small amount of levelled terrain near the Frame, your massive colony ship and the objective for your opponents. Apart from that, the rest tends to be rather bumpy. For example, look at this map, coincidentally in the shape of a giant fish, scales and all.

You need to flatten the rest of the ground yourself to be able to build on it. This is done by Brigadiers, hovercars maintaining a small army of hovering drones that shape the land by eating it and dumping it elsewhere. You can also build ditches by lowering the terrain until it hits the abyss below, which damages anything moving across it. Basically, the map is completely deformable. It’s quite cool, and the landscape morphs very smoothly without any jagged edges due to the engine using voxels rather than polygons, but because the engine is having to track the height of the entire map, the game is more of a systems hog than it looks.
The converse of needing flat ground to build on is that if the land underneath a building becomes uneven, it starts taking damage over time. Your announcer will take great pleasure in telling you this every couple of seconds. It’s a pain to sort out: your builders – called Buildmasters – will continually pour energy into the building to repair it until your Brigadiers even out the ground. That’s energy you could have spent on building Labs, units, turrets, or anything else.
By that point, the ground’s probably been taken out from about three other buildings by whatever’s attacking you. Then one of them runs out of health and collapses, making a nice crater that damages anything next to it, and so on in a vicious cycle. If those craters reach an Energy Core, the tall towers that power buildings close to them, you’re in even more trouble, as you’re in danger of losing power to buildings around them. Combine this with the fact that Buildmasters and Brigadiers are both under the same tight unit limit, and this can become a real headache, so you want to minimise the amount of terrain damage you’re taking as much as possible.
One obvious way to limit it is by fending off enemy attackers with units of your own. The other way is by fortifications.
Almost any strategy game will have fortifications of some sort. Even in something as fast and aggressive as Starcraft, turrets supporting your army can help you fend off an attacking force larger than yours. What you don’t see as much of these days is walls.
Walls have an odd role in strategy games: they can block off paths for enemies, yes, but they’re vulnerable to siege weapons, and towers built behind the walls usually don’t have enough range to shoot back at them. This means that walls are more useful for slowing down an attacker, or for funnelling them into “killzones”, than they are for outright rebuttals. They’re also a pain in the neck to build properly: it’s all too easy to build a wall between two cliffs, then find out you missed off a tiny section that units can pass through.
This difficulty in building the ultimate defence isn’t really a bad thing: if you could build fortifications that were tough to crack, a game could quickly devolve into an endless slugging match between two impregnable fortresses. Total Annihilation springs to mind: the walls are almost indestructible, some towers are gargantuan siege cannons that can attack the other side of the map, and the Energy needed to power those towers can pretty much be gathered from anywhere.
Perimeter’s walls get around these problems.

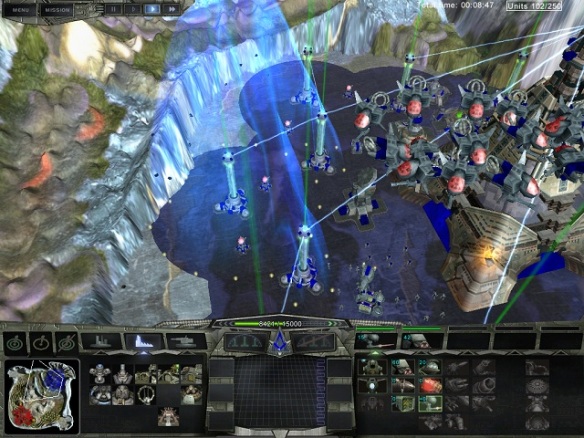
That big shiny glowing morass is the eponymous Perimeter. You flip a switch on some or all of your Energy Cores, and up it goes. Nothing can fire through it – including yourself – and enemies that try to move through it will blow up in short order. It’s almost the perfect defence, but having the entire shield up burns through your energy really quickly, so often you’ll be turning Energy Cores on and off as attackers change targets rather than putting up the whole thing.
It also introduces walls as an offensive tool. If the area powered by a Core contains another Core, then raising the shield on one protects the other. If it’s yours, that is. If it’s your enemy’s, you capture that Core, as well as the buildings it’s powering – turrets, labs, everything. Capture all the enemy’s Cores, and you can even capture their Frame instead of having to destroy it.
There’s a much faster way to capture buildings, though.

Here we’re playing one of the early campaign maps where there’s a good opportunity to capture the entire southern wing of the enemy base. When you build Energy Cores, they link up to a nearby Core and try to form a chain back to the Frame. If they can’t, they lose power and shutdown. Whoever powers them up gains control.

If you can find a weak link in the chain, you can power down whole sections of an enemy’s base and take them for yourself before they’ve realised what’s happening.
Now that I’ve started using examples from the campaign, I should stop before I get too ahead of myself. We’ll start looking at how the campaign plays out next time.
Unit Spotlight: Underground Units
I said the Perimeter blocks everything from passing through. That’s not quite true: underground units can go underneath. There are only two of them, but that’s all you really need. The first one can’t buildings, or land underneath them. Whatever. Here is the second one, the Scumer:

It burrows under the enemy base and chews up their land, causing damage both instantly and over time to the buildings above it. That’s a pain in the neck for the reasons I described above. The other reason they’re annoying is how you get rid of them:

That round structure next to the Scumers is the game’s underground turret. It fires slowly, the missiles take time to hit, and the turrets are fairly large, so you can’t build too many of them and they can be tricky to fit into your base. You might destroy the Scumers, but they can do a lot of damage before that and generally annoy the hell out of you. If nothing else, they keep you distracted while the enemy assembles something better.
But you can just take them out with units instead, right? Sort of. Below is the Extirpator, your only anti-subterranean unit. It’s a lot nastier, but they use a lot of Energy when firing, and if you’re attacking Scumers inside your base it can backfire.

Look at the crater it leaves! Exactly the sort of thing you want to make next to your own buildings. In short, you’d better hope you can intercept Scumers before they reach your base, otherwise you can look forward to a few minutes of nonstop irritation.
Later on in the battle, you can bring enough Energy in to attack with the Extirpators instead, as I’m doing above. You’ve seen how much damage they can do to buildings. Add in the fact that they can also fire at buildings from the other side of the Perimeter, and they can be very nasty indeed.
I’ll talk about others turrets as and if they come up. Next time we’ll stop guffing about game mechanics, and start looking at the campaign. We’ll take a look at the universe the game takes place in, the different factions involved, and tutorials in campaigns. We’ll also start looking at some missions in detail rather than making more sweeping generalizations.
